Monday, 21 January 2013


Sunday, 20 January 2013
Saturday, 4 August 2012
All his favourites in one, Birthday Cake.
My lil one turned 2 today and I am in denial. Its seems strange that me, who still cannot believe that she is married and a mum, has a toddler in his twos. Wow! Anyways, this post is not about my denials but about him my superstar, lil Z. So like any other toddler, Z has a couple of things he loves. Wake him up in middle of the night and he will happy to devour them. His favourite foods and my guilty food cause I usually turn to them only when a) he is not eating anything else and b) because its all the "wrong foods" for him. Anyways, since this being a momentous occasion and all, after all you only turn 2 once, I decided to bake him a cake with all his favourites. So, what are his favourites you ask? Lemme list it for you.
- Fruit loops
- Cream cheese frosting
- Chocolate chips
- Sprinkles
- Crayons ( Dont ask, I have crayons with bite marks on them all over the house)
- Cupcakes
So then, I thought and thought and thought as to how I could incorporate all his favourites into one and voila..'All his favourite birthday Day' aka Rainbow cake with cream cheese frosting, decorated with fruit loops, sprinkles and liberally strewn with chocolate chips. 'I left the waxy crayons out and drew inspiration form their lovely colours. Needless to say, I think it was his best birthday yet. :)
Here is what you need,
- One packet white cake mix. Any box cake will do. I used a Pillsbury white cake mix
- Food colouring
For the frosting,
- 8 oz of cream cheese at room temperature
- 1 stick of butter also at room temperature
- 2 cups of icing sugar
- 1 tsp of vanilla essence
For extra garnish,
- 1 small box of Ferraro Rocher
- 1/2 cup semi sweet chocolate chips
- Rainbow sprinkles
- Handful of fruit loops
Method:
- Prepare the cake batter as per the instructions on the box.
- Now divide them into 7 equal parts and add the food colouring of your choice and mix well.
- Now, proceed to put on colour in to the baking tray and as it spreads in the tray, put the next colour on top. Keep putting all the colours in concentric circles ( the cake tray will resemble a dart board at this point) untill all the batter is in the tray.
- Now bake it according to the instructions on the box.
- While it is baking, cream together the cream cheese and butter until light and fluffy.
- Then add the icing sugar and continue to mix it using an electric whisk.
- Now add the vanilla essence and whisk until fluffy.
- Refrigerate the frosting to set a bit.
- Once the cake is baked and cooled, proceed to frost the cake.
- Then decorate it using any of the garnishes mentioned above or just about anything of your choice.


Friday, 6 April 2012
Breakfast bread pizza
Ok..So this is not a new recipe but there is something about standard classic dishes that is so romantic. Its brings about a wave of nostalgia, its surprisingly filling and its quick and simple to make. I can't think off a better example than Bread Pizza to point this out. If you have not tried it yet, go go go..try it and for those who have, let do it again.
Here is what you need,


Here is what you need,
- Few slices of bread
- Grated cheese, preferably Mozzarella
- Pizza sauce
- 3-4 Sliced mushroom
- 1 diced bell pepper.
- A pinch of pepper
- Butter
Method:
- Preheat oven to 350 degree Fahrenheit.
- While the oven is preheating, spread the butter lightly on the bread.
- Then spread the pizza sauce over it ( If you don't have pizza sauce then, either use garlic butter/spread instead of butter and then apply ketchup over it or heat a pan and saute a little bit of garlic paste very lightly, then quickly add ketchup to it. Mix well)
- Now arrange a few slices of mushroom and diced pepper on top of it. (Actually, anything you like can be added on it, including thinly sliced sausages)
- Now liberally spread grated Mozzarella on top
- Bake for about 6-8 minutes or until the cheese is all melted.
- Dig in!
See, it really cannot get more simpler than this now, does it.
I know I have not been around a lot, but I surely hope this is gonna be my comeback post.


Saturday, 24 September 2011
Vanilla cupcakes with choco surprise and smarties
Every so often my little niece gets bitten by the baker bug and then she puts on her cute little Miley Cyrus apron, dusts a little bit of flour on her hair (apparently this makes her look professional or so she seems to think) and then pesters me to help around in the kitchen (read..do the actual baking) while she walks around shouting instructions (I have a feeling she has been watching Hell's Kitchen on the sly) and looking harried and busy! So, today she started pulling me to the kitchen, I decided to take the easy route and make cupcakes. The extremely simple vanilla cupcakes with choco surprise and a smattering of smarties on top. The smattering of smarties, courtesy the niece. This is absolutely simple for all that is required to make them is to drop all the ingredients into the food processor and blitz until smooth and then bake em. Very simple yet very very satisfying to eat. Here are the things you need,


- 1 1/4 cups of flour
- 1 tsp baking powder
- a pinch of salt
- 2 eggs
- 125 grams butter
- 3 tbsp milk
- 1 cup sugar
- 1 tsp vanilla essence
- small slabs of chocolate (Diary Milk, Lindt..whatever you have in your purse or in the fridge)
- Handful of smarties
- Pre heat the oven 200 degree Celsius
- In a food processor, blitz together all the ingredients except milk until smooth.
- Then pour in the milk at the end and pulse until it combines well
- Scoop the batter into your cupcake mould and press in a slab of chocolate in the middle.
- Bake for 20 minutes until the cupcakes turn slightly golden on top
- Remove and let it cool.
- Sprinkle a few smarties on top
- and then watch as your niece walks around telling everyone how difficult it was to bake the cupcakes but nonetheless how she did it on her OWN.
- Sit back and smile!


Friday, 23 September 2011
Banana Toffee Pie (Banoffe pie)
When you come across the same dish in 4 different blog, all in a single day, then think no more. Its the great baker in the sky telling you that its time you made that dish. And hey, who am I to question the great baker's plans? and so I made the Banoffe pie, which is simple banana and toffee mashed up together, much like in this dessert. Its decadent, its rich and its most definitely yummy. Its true that you cant eat too many helpings cause it is frankly a sickly sweet recipe and you can get satiated with one slice but thats only a problem, if you are just making this pie for yourself. One the other hand if it is for a dinner party, then you wouldnt know where the dessert disappeared! Here are the things you need,


- 4-5 medium ripe bananas
- 400 mils of double cream
- 1/2 cup sugar and 3tbsp butter
- 3 tbsp water
- 1 tin condensed milk
- 250 grams of digestive biscuits
- 125 gram butter
Method:
- In a blender/food processor, mix together the digestive biscuits and butter until they form coarse crumbs.
- Press the biscuit crumbs onto a springform tin to form the base. Remember to press the crumbs on to the sides of the tin.
- Refrigerate for 1/2 an hour
- In the meanwhile, on low heat melt together the sugar and water. Stir until all the sugar is dissolved.
- Then raise the heat to medium and leave the sugar undisturbed for 5 minutes or until it begins to caremelize.
- Now quickly add the condensed milk and butter and whisk until the toffee sauce thickens.
- Then remove the rested pie shell from the fridge and pour half of the sauce all over it, including the sides.
- Refrigerate it for a further half an hour.
- Now chop the bananas into medium sized slices and whip the cream to form still peaks
- Fold the bananas into the cream
- Spread the cream evenly over the biscuit and toffee base
- Pour the remaining toffee sauce over the cream and refrigerate for another 1/2 an hour.
- Then dig in!


You could omit steps 4,5,6 and make toffee sauce another way. All you need to do is remove the label from the tin of condensed milk and then immerse the tin in a pot water and place that pot on low heat (simmer) for about 2 and half hours and then when you crack open the tin of condensed milk, voila! its toffee sauce! :) While, this is a far easier process it is a lot more time consuming. So, choose your method according to your convenience. The result is just the same though!
Also, one way to reduce the sweetness of the dessert if its a tad too much for you would be to use, just ripe bananas instead of medium or overtly ripe ones. This way, the lack of sweetness in the bananas will help even out the overall sweetness of the dessert.
For the base, try using salted butter instead of unsalted butter, as the saltiness of the biscuit plus the butter forms and interesting clash with the sweetness of the toffee sauce.
Remember to wear stretch pants ore PJs when you eat the dessert. Why you ask, you will know! This dessert might even make you wish for spandex! :P
Monday, 19 September 2011
Strawberry and Cream Cake
You know how sometime you need a break from things you love just to renew that love and not feel satiated? Well, that feeling hit me recently and I needed to take a break. A break from chocolate that is. I absolutely love chocolate and it would so be among the list of things that I would take with me to a deserted island but lately, I've just been having so much of it that I feel my enthusiasm for it dip a little bit. I no longed seem to be calling dibs on the last slice of chocolate cake or that last bite of absolutely sinful dark chocolate and even worse, I seem to be the one passing on the last bite to someone else. **Gasp** and so, I took a break and decided to do something completely non-chocolatey and what can be more non chocolatey than Strawberries and Cream. Plus, I had agreed to bake something for a friend and so thought this could be my chance for the break from chocolate. I have to admit, I din't really expect this cake to be amazing or anything. Seriously, what chance did poor strawberries have against chockies but they surprised me. They seems very moist, melt in your mouth and very very light. The only downside that I saw to the cake was that it was a tad too sweet for my liking and thats really my fault cause when I bought the cream for the cake, I din't really check to see if the cream was sweetened or not. Well mine was and that I think brought the cake down a couple of notches. So careful with your cream selection. Anyways, here are the things you need.


For the cake,
- 200 grams of flour
- 25 grams of cornflour
- 3 tsp of baking powder
- a pinch of salt
- 4 eggs
- 1 tbsp vanilla essence/extract
- 225 gram butter (about 2 sticks and little more)
- 1/4 cup of milk
- 2 cups of sugar
For the filling,
- 1 cup of fresh strawberries sliced or a cup of strawberry preserve.
- 400 mils of cream whipped until stiff.
Method,
- Preheat the oven to 180 degree celcius.
- Cream together the butter and sugar until fluffy.
- Then add the vanilla extract and whisk.
- Now whisk in the eggs one by one. Add a spoonful of flour in between each addition of egg.
- Then, fold in the remaining flour, cornflour and baking powder.
- Once its all folded in together, add the milk and slightly loosen up the batter.
- Pour it into a baking tin and bake for 35 minutes or until the top of the cake browns and the tester comes out clean.
- Remove and let it cool completely.
- Then using a sharp knife, slice the cake into two equal halves. (You could actually save the trouble slicing the cake if you have two identical cake tins, in which case, all you need to do is spoon in the batter equally in to both the tins. Also, remember to lower to baking time to about 25 minutes)
- Spread the strawberries (fresh or preserved) equally on bottom half of the cake.
- In a bowl, whisk the cream until it forms soft peaks and then spread it generously over the strawberries.
- Now sandwich together the cakes and voila! its done.
- Dig in.


I wish I could have shared the pic of a slice of the cake with you. But like I said, I din't make it for myself and so when I took the cake over to her place and sliced it up, I forgot to take the pic. But take my word for it, it was so pretty. Golden cake with white and pink inside. Pretty as a picture!
Monday, 12 September 2011
Apple Tart
I had never tasted an apple tart. Until yesterday! Yup. Always shied away from it and picked another dessert. It was instinctive. Nothing about an apple tart yells out to me and still all my friends and my family swear by it. They claim, you cannot go wrong with it. Its a safe dessert. And so, yesterday when I found my fruit basket dangerously over stuffed with apples, I thought it was perhaps time to tackle the apple tart monster! Grab it by its horns and devour it to submission. Well, atleast that was the plan but alas, its just not my monster. Know what I mean? I made the tart shell from scratch, lovingly made the fillings, waited to get it baked and the result..it was blah in my mouth. Don't get me wrong, apparently the dessert was delicious. It had to be cause my Mum who always says no to dessert went in for seconds and there is no more tart left but still to me it was blah.
I always feel that a good dessert has to overwhelm you. There should something about it that explodes in your mouth. It could be the flavours, its subtlety, a surprise element, anything but it has to impress you and that's where I felt my apple tart failed. Atleast to me. Well, no more apple tarts for me and like I said, I'll never get around this monster but thats just cause, this is just not my monster. Nonetheless, if you like apple tarts then here are the things you need,
For the shell,


I always feel that a good dessert has to overwhelm you. There should something about it that explodes in your mouth. It could be the flavours, its subtlety, a surprise element, anything but it has to impress you and that's where I felt my apple tart failed. Atleast to me. Well, no more apple tarts for me and like I said, I'll never get around this monster but thats just cause, this is just not my monster. Nonetheless, if you like apple tarts then here are the things you need,
For the shell,
- 250 grams of flour
- 125 grams of cold and cubed butter
- 1 tbsp of water
- a pinch of salt
For the filling,
- 3-4 large apples sliced along the length
- 25 grams of butter + 25 grams of sugar
- 250 mils of cream
- 100 grams of sugar (or more if you like it really sweet)
- 1 egg
- 1 tsp vanilla extract
Method:
- Mix together the all the ingredients for the tart shell and press them together. Do not knead as it can make the shell a little tough. Press them well, between cling films and refrigerate for atleast 2 hours.
- Then roll it out to desired thickness and line your tart tray with it. Trim of the excess from the edges.
- Now, cut the apples lengthwise and line the prepared shell with it.
- Mix together the butter and sugar and brush all over the apples well. Alternately, you could dip the apples in this mixture first and then line the tart tray with it.
- Now in an oven preheated to 220 degree Celsius, bake the tart for 10 minutes.
- Then reduce the temperature to 200 degree Celsius and bake for further 20 minutes.
- In the meanwhile, whisk together the cream, sugar, egg and vanilla extract.
- Once the tart has been baked for the required 20 minutes, remove from oven and pour the cream mix all over it until the apples are submerged in it.
- Now return the tart to oven for another 10 more minutes.
- Remove and serve while slightly warm.


Sorry about the really really bad photos. Lack of inspiration plus the lack of a good camera can do this to us! :(
Wednesday, 7 September 2011
Nuttty, Overdose on Chocolate Cake
Really! The title of the post is the best way to describe the cake. Its nutty..almondy to be exact and its packs in tons of chocolate. Its death by chocolate and boy! what a way to die. I honestly feel that there are two kinds of people in this world, those who can eat a chocolate cake and then those who devour a chocolate cake. This cake is for those devour-ers. Oh yes, its squidgy yet light and has that dampness to it that is almost fudgy. Yet like I said, it feels light. Miracles I tell you. I've based the recipe on Nigella Lawson's Nutella cake, but I've tinkered around a lot, like I'm always prone to do.
Here are the things you need,
For the cake,


Here are the things you need,
For the cake,
- 1 large bottle of chocolate spread
- 125 grams of butter
- 100 grams of ground almond (about half a cup)
- 1 tbsp strong coffee
- 6 eggs separated
- a pinch of salt
- 100 grams melted best quality dark chocolate
For the icing,
- 125 ml of cream
- 125 grams of dark chocolate
- 1 tbsp strong coffee
- Handful of toasted almond flakes
Method,
- Preheat the oven to 180 degree Celsius
- In large bowl, whisk together the egg whites with a pinch of salt to form soft peaks
- In a another bowl cream together the butter and chocolate spread.
- Add to it the coffee, eggs and the ground almond one by one. Mix well.
- Then fold in the melted dark chocolate.
- Now, spoon a large dollop of the flully egg white in to the chocolate mix and combine thoroughly.
- Fold in the remaining egg whites, one third at a time, until everything has been folded well. Don't be too heavy handed as we need the batter to be light airy.
- Pour the batter into a greased springform tin and bake for about 35-40 minutes.
- Once done, remove from oven and leave the cake to cool.
- Meanwhile, on low heat, add the chocolate to the cream.
- As it begins to melt, add the coffee.
- Once the chocolate has melted completely, take it off the heat and whisk well until the mixture thickens.
- Now, pour the icing over the cake and spread well, over the sides too. Let it be messy. Messy is yummy! :)
- Scatter the toasted almond flakes on top.
- Dig in!
Note: I found the refrigerating the cake for about 15 minutes, helps in binding all the elements of the cake well and reinforcing the squidginess of the cake, which I particularly adored.


Wednesday, 31 August 2011
Cream Cheese Brownies
Oh my God! I dont know about you but I did not know about cream cheese brownies until today and boy was it a revelation or what! I am hooked and I dont think I can go back to normal brownies anymore. The saltiness of cream cheese breaking out through the intense taste of sinfully dark cocoa is, well, indescribable. You have to taste it to believe it. If you are a fan of cheese and fan of chocolate like I am, then this one is for you. I had even hardcore cream cheese haters reaching out for seconds. I can't say more, except..yummmmmmmmmmmmmmmm!!!
Here is what you need,


Here is what you need,
- About 6 overflowing teaspoons of cream cheese/cheese spread
- 100 grams of milk chocolate
- 75 grams of cocoa powder
- 1/2cup of flour
- 2 eggs
- 1 cup granulated sugar
- one stick of butter
(Gosh, my measures are all over the place. But I swear, I will get better soon! )
Method:
- In a saucepan,over medium heat, melt together the butter and chocolate.
- Then take it off the heat and while still hot, stir in the cocoa powder and leave it to cool.
- In another bowl, beat together the eggs and sugar.
- Then beat in the chocolate mix to it. Combine well.
- Now slowly sift in the flour and continue to beat the mixture until everything has combined well.
- In your brownie tray lined with foil, pour in half of the batter.
- Then spoon in the cream cheese equidistantly.
- Pour the remaining batter.
- Now bake the brownies for about 20 minutes in oven preheated to 170 degree Celsius, until a toothpick when inserted comes out with little gooey mix on it.
- Leave the brownies to cool and then leave it in the freezer for about 10-15 minutes.
- Cut into squares and prepare to be absolutely floored by it! (or so I hope!)


Tuesday, 30 August 2011
Nigella's Mini Key Lime Pie
Well, as you can probably guess, I have an abundance of lime around me and so, I'm doing the best thing I can do with it, make pie! :) :) That and the fact that I got gifted Nigella's ' How to be a Domestic Goddess', which is filled with many many of such lime n lemony treats. Its truly a simple recipe and what I like about it is because we make it in small tart tins, it gives us scope for experimentation. The basic recipe stays the same, but you can always add different flavouring agents to it and so you end up a dozen or more pies, all in different flavours! An assorted pie tray of sorts. Well, I tried many of them. Tried the basic lime pie, key lime pie, orange pie, passion fruit pie and pineapple pie. Stayed on course with tropical fruit though. Its really simple, you should most definitely try it. You don't even need freshly squeezed juice to get the flavour, packaged organic juice works just fine. Nonetheless the name of the post is Nigella's Mini Key Lime Pie cause, well it is her recipe after all and all I've done is make changes to it.
Here is what you need,


Here is what you need,
- 1 can of condensed milk
- 2 egg yolks
- 2 egg whites
- 250 gram digestive biscuits
- 100 grams of butter
- about 4 tbsp of key lime/lime/pine apple/passion fruit/orange juice (Not all at the same time but you know that already. However, I wonder if adding spoonful of each would give it a carribean flavour?? Hmmm..I wonder)
- A pinch of salt
Method:
- Pulse the digestive biscuits and butter together in a food processor until it forms nice buttery crumbs.
- Then press it into your mini tart tins. Take care to line the sides too.
- Leave in the fridge for atleast 30 minutes.
- Pre heat the oven to 170 degree Celsius.
- In a bowl, whisk the egg yolks together until it becomes thick.
- Continue whisking and add the condensed milk and the fruit juice of your choice. Mix well.
- In a different bowl, beat the egg whites plus the salt until it forms soft peaks.
- Now fold the whites in to the yolk mixture.
- Pour it into the biscuit base and bake for about 10-12 minutes.
- Leave it to cool completely. Refrigerate if possible.
- Serve! Yum!


The only disappointment I had with these pies, and it was more my fault than theirs, was that they looked a bit boring! I expected my lime pie to be green and my orange pie to be, well, orange and so on. I know I am being silly but really, these neutral colours broke my heart a little.:(
Monday, 29 August 2011
Simple Syrupy Lemon Cake
Notice how the most simple in life are the most worthwhile? Like you could party with the celebrities in the coolest clubs, yet it is a cuppa coffee you shared with a long lost friend that means more. Or how you can stock up on all the latest gizmos and phones and all that but there is nothing quite like a looooooong conversation made on your landline phone. Or you could sign up to a million social networking sites to keep in touch with friends but it doesn't even to begin to hold a torch to a letter from a pen friend. A date could take you to the choicest restaurant and buy you the most expensive dinner but its most often the cab ride home that makes you wanna see him again. There is nothing more appealing than holidaying abroad, well perhaps there is one thing more appealing, coming back home to your familiar bed. You get the drift of what I'm trying to say now, don't you? Well, just like that, you could make the fanciest cakes in the world with the most amazingly sinful frosting, yet there is nothing about it that warms your heart like a homemade syrupy lemon cake.
Made it yesterday after eons and it felt familiar, it felt nice, it felt like home.
Here is what you need,
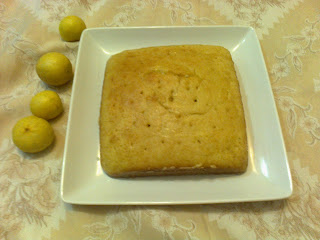
Made it yesterday after eons and it felt familiar, it felt nice, it felt like home.
Here is what you need,
- 11/2 cups of flour
- The zest of one lemon
- 2 tsp baking powder
- 2 eggs
- 4 tbsp milk
- 3/4 stick of butter
- juice from 1 1/2 lemons
- 100 grams of icing sugar
Method:
- Preheat the oven to 190 degree celsius.
- Cream together the butter and sugar until fluffy.
- Then add the eggs one by one and the zest of the lemon and mix well.
- Into it add the flour and baking powder and mix really well.
- Finish it off with milk and once again mix well.
- Pour the thick patter on to a greased and floured baking tin and bake for 40 minutes.
- In the meanwhile, mix together the lemon juice and icing sugar on low heat, until all the icing sugar melts and a lemony syrup is formed.
- Once the cake is baked, using a tooth pick or fork, poke holes all over the cake.
- Now pour the lemon syrup over the cake, making sure it reaches all the corners.
- Let it cool until all the syrup has been pulled in by the cake.
- Then, Dig in!!!

**Note: I baked two cakes in a go, and so made a variation with the second cake. I used passion fruit for the second one and the only difference I made to recipe was to omit the lemon zest from the batter and instead add 1 tbsp of passion fruit juice. Also, for the syrup, lemon juice was replaced with passion fruit juice. Dare I say, the passion fruit version was slighlty more yummier than its lemony cousin. But I've featured the lemony cousin here cause its more "home" than passion fruit will ever be.
Friday, 26 August 2011
Steamed Rice And Prawn Pie
Seen those bamboo steamers that are such a rage these days? Well, a few weeks back I happened to go travelling to the interiors of India and what do you know, the tribal have always been cooking with them. Infact, I happened to meet a very accommodating local who within a matter of minutes, chiseled out for me, my very own bamboo steamer. Yup, custom made! How cool is that? Anyways, today I decided to put the steamer to good use and baked my self a yummy steamed rice n prawn pie.


Here is what you need,
- 1 cup Basmati rice or small grain rice (which ever is handy) soaked in water for a couple of hours
- 5 cups of coconut milk (You could also use 3 cups coconut milk with 2 cups water if you like)
- Pinch of sal
- 1 cup cooked prawns
- 1 onion finely diced
- 2-3 cloves of garlic, finely chopped
- 1 tsp chili powder/paprika
- 1/2 tsp turmeric powder
- a small piece of ginger, finely grated
- a small knob of butter, melted
Method:
- In blender, mix together the pre soaked rice with coconut milk until a very smooth and runny batter is formed.
- Add the salt to it and mix really well. Keep aside.
- In a pan, pour a little oil and saute the onions until they turn translucent.
- Now add the garlic and ginger and saute for a couple of minutes.
- To this, add the paprika/chili powder, salt and the turmeric powder and fry until the raw smell disappears.
- Now tip in the cooked prawns and mix until everything is well coated with the spices.
- In a greased cake tray, pour half of the rice batter and allow it to steam for 10 minutes or up until it cooks and becomes firm.
- Then, lay down the prawns in a layer on top of the cooked rice batter and pour half of the remaining batter on top.
- Steam it for 5 minutes and then quickly pour the rest of the batter on top.
- Steam for a further 10 minutes or up until the pie is fully cooked. You could try the toothpick test to check if the pie is cooked.
- Remove from the steamer and give the pie a butter wash.
- Let the pie cool before transferring it to your serving dish.
- Enjoy!! Yum!


PS: I know it looks a little minimalistic and plain jane, but the flavour of the prawn and the melt in your mouth consistency of the pie more than makes up for it.
Thursday, 25 August 2011
Cheesy Coriander Bread
Cheesy Coriander Bread. *Sigh* Oh the smell that was wafting around the house whilst the bread was baking...Aah, I could just live off that smell. If you and I are going to be friends, then there an are three things you need to know about me.


1) I love bread. I can eat it all day long. I love bread with everything. From my curries, to my jam, to my butter, to even my white sauce. Everything is fine with a little bread by its side.
2) I adore cheese. Nothing is too cheesy (excepting pick up lines :P ) Cheese is the Mary Poppins of the food world. You can put cheese in my tea and I might throw out the tea but rest assured the cheese will find its way into my tummy.
3) Coriander. The best herb ever. I love my curries and no curry is complete without coriander. Call it cilantro, call it coriander, call it what you may but if you are talking spicy and talking garnish, coriander better be on the plate.
So, cheesy coriander bread. Need I say more?
Here are the things you need,
- 4 cups of flour
- 2 1/4 tsp of dry yeast
- 11/2 cups of warm milk
- a pinch of salt
- Finely chopped coriander, including the stalk. How much depends on how much you like its taste
- Grated Cheddar
- 3-4 cloves of finely chopped garlic.
- One egg
Method:
- In a bowl, mix together the yeast and milk well until all the yeast has dissolved.
- Now add the salt to the milk.
- Then quickly add the flour little by little until it forms a ball. Knead for a minute or two until flour and milk is well mixed.
- Cover the dough using cling film and leave it untouched for a couple of hours or until the dough has doubled in size.
- In a different bowl, mix together the grated cheese, coriander and garlic and keep aside.
- Once the dough has risen, knead if for a couple more minutes and divide it into 12 balls.
- Roll out the balls into small circles, using a little flour to prevent it from sticking to the rolling pin.
- Now scoop a little of the cheese and coriander mixture on to each of the dough circles and seal off the edges to form a semi circular shape.
- Arrange them on to a greased bread loaf tray, so that they overlap one another.
- Let it rest for another 20-25 minutes
- Once risen, brush them with egg and bake in an oven pre heated to 180 degree celcius for 30 35 minutes.
- Serve!!!


Wednesday, 24 August 2011
Bourbon biscuit ice cream and butterscotch sauce
Ever been in a situation when you are gonna have guests over and you plan and plan about the various courses and completely forget about dessert? Anybody? Somebody? Nobody? Well, It looks like I am the only person to get into fixes like this. Hmmm..It so happens that I have friends over for dinner tonight and I wanted everything so purffect that I spend eons of time planning on what the appetizer and main course would be and the scatterbrain that I am, completely forgot about dessert. I know, unforgivable right? I mean, the dessert is my most favourite part of the meal and still I somehow forget about it. And so here I was thinking I would pick up a cake or a tart or something else sweeter still from my local bakers when like a beacon of hope, Nigella Express began on TV. There are times when leaving the TV on with no one watching it pisses me off, but today was not one of those times. I just grabbing my keys on my way out when I heard Nigella go on and on about a quick fix dessert and boy was it easy or what. Its so simple that I'm sure most of you know about it already but to me it was lifesaver. Its a quick fix dessert and so quick that it already in the deep freeze and I even have time to write about it. It totally deserves a post dedicated to it.
Here are the things you need,
For the Ice cream:

I so wanted a pretty pic of a slice of ice cream with the sauce on it, but in the mad rush of having people over, I completely forgot. However, the ice cream was a raging success. I personally thought that there was no need for the sauce as the ice cream itself was so good.
Here are the things you need,
For the Ice cream:
- 1 medium tub vanilla ice cream
- 1 medium packet of bourbon biscuits
- 1 cup chocolate chips (or in my case the left over scraps from my Orange n Choco Chili snaps)
For the butterscotch sauce:
- 2 tbsp white sugar
- 3 tbsp brown sugar
- 2 tbsp butter
- 250 ml of cream
- A dollop of honey
Method:
- Leave the ice cream to thaw in a mixing bowl
- In a zip lock bag, put the biscuits and chocolate chips and pound the living living daylights out of it.
- Add it to the thawed ice cream and whisk it all together really well.
- Pour in into a cake tin and return to deep freeze for the ice cream to set
- Now, in a pan, bring to boil the butter, honey and the sugars until it caramelises.
- Then take it off the heat and let it cool slightly.
- Add the cream to the sugars and mix well.
- Reheat it slightly before serving.
- Pour over the ice cream and enjoy!

Monday, 22 August 2011
Chocolate and Almond cake
Honestly, there has been so much of yumminess about of late, that I just cannot seem to get the time to try everything. Case in point, Sugar Slut's Honey and Almond Cake. It looked so divine and so 'gotta have it' that well, I couldn't resist. And today, that's exactly what I made, well almost. Now is about a good time know this about me, but I absolutely detest making short runs to the supermarket. I mean, I do go grocery shopping, but once a week or once in two weeks is all the shopping I can take at a time.Why am I saying all this? Well, it was only after I began get the ingredients together that I realized that I was short of honey and so, I decided to improvise. Yet again. Instead of honey, I used chocolate and the result was, thankfully not disappointing.Not that you can ever go wrong with chocolate. The best part about the cake is its understated sweetness. Its such a perfect companion to your tea and nothing about this cake is overpowering. Its harmonious, if you know what I mean. However, from the aesthetic point of view, I think the Honey and Almond cake kicks the Chocolate and Almond cake's rear! Perhaps I should have put some sorts glaze on the cake to mimic the honey effect. Anyways,
Here are the things you need,


Here are the things you need,
- 1/2 a slab of chocolate (about 125 grams)
- 1/2 cup sugar
- Juice of 1 lemon
- 100 grams of butter (close to a stick)
- 1 1/2 cups of flour
- 2 tsp baking powder
- 1 cup of almond flakes
- 2 eggs
- 1 tbsp milk (only if necessary)
Method:
- Preheat the oven to 170 degree Celsius.
- In a pan, gently simmer the chocolate, sugar, lemon juice and butter until it forms one smooth mixture.
- Then remove from heat and quickly add the eggs one by one, whislt stirring well.
- Then fold the sifted flour and baking powder mix into the egg mix
- Once you've folded everything together, if the mix appears a tad too thick, then add about 1 tbsp of milk to it to slightly smoothen the batter, otherwise, omit the milk.
- Now pour half the batter to a buttered cake tin and then stop to sprinkle some almond flakes.
- Pour the remaining batter on top and sprinkle some on almond flakes and bake for about 30-35 minutes.
- Serve!!


Note:
My batter required the addition of milk because it was a tad too thick for my liking, perhaps because I used a special edition Brazilian chocolate bar which had a sticky consistency. Like I've mentioned above, check if your cake batter really needs the milk before adding it.
Friday, 19 August 2011
Orange n Choco chili snaps!
Ok, so ever since I saw Procrastobaker's Peppermint Crisps, I've been dying to bite into one. I mean, Chocolate and peppermint are two of my all time favourite things and here it was both together in one amazing looking cookie. I couldnt wait to make it and one of the first things I did today morning was to make up my mind make it today itself. It only required minimal ingredients, all of which was there in my pantry. Turns out I was wrong. I did not have peppermint extract and there cannot be peppermint crisps without peppermint, now cant it? But I was so looking forward to my chocolate fix and so I did what I do best, Improvise. I knew I definitely had orange extract in my kitty and plus there were a couple of fresh oranges handy, so I decided that instead of peppermint, orange it would be and so was born my orange and choco chili snaps. Why snaps and not bars or cookies? You'll know soon enough. :)
Here are the things you need,

Here are the things you need,
- 250 grams of chocolate chips or roughly chopped bars
- 1/2 cup sugar
- 1/4 cup grated coconut
- 1/2 tsp orange extract
- 1/2 cup water
- 1 tbsp zest of orange
- 1 tbsp orange juice
- 1 green chili cut along the length (for a bit of spice. Omit if you are not a chilly fan)
Method:
- Boil water,sugar and chili together until all the sugar dissolves.
- Then remove the chilly and let the sugar syrup remain untouched until it caramelizes. As soon as it the sugar syrup changes colour and turns a pale yellow, switch off the heat.
- Now add the orange extract and swirl the pot to incorporate the sugar syrup and the extract.
- Now in a baking tray lined with parchment paper, pour the sugar syrup and let it sit for 15 minutes or until it hardens.
- Once it hardens, break the sugar into pieces and pulse it in a food processor until it becomes sandy.
- On double boil, melt the chocolate and remove from heat.
- Then add the coconut, orange juice and the finely ground orangy sugar. Mix well.
- Once again, in a baking tray lined with parchment paper, spread the chocolate mix evenly
- Sprinkle the orange zest on top and refrigerate for 1-2 hours.
- Serve! Yummy!

Apologies for the really poor photograph. Its that, as soon as I was taking the chocolate off the fridge, in walked my 6 year old niece with her gang of friends and this pic was all I could manage before the attack. :)
Few notes:
** Because I live in a humid environment, the formation of the orange sugar sheet was extremely tricky as the moment I took it out of the fridge the sugar would turn sticky. So, all those people living in hot and humid conditions, keep this in mind and take care to pulse the sugar sheet into sandy sugar only in the last minute just before you add to the chocolate mix.
**Also, if storing, keep the chocolate under refrigeration as well, the humidity can cause it to melt.
** And finally, why did I call these chocolate bars, SNAPS? Because, I forgot to score the chocolate before setting it to harden and so had no choice but the snap the chocolate. I had no shapely chocolates! but it tasted awesome nonetheless!
Thursday, 18 August 2011
Crispy Fried Cauliflower Florets
As a person I like to multi-task. I am never doing only one thing at a time and most of the times I get pulled up for this. Like, I can never read only one book at a time or I can never only just be watching televison, I just have to constantly work other things in to the equation. Like when I am baking cookies, I have to make ice cream with the crumbs, or I have to be on phone when I am watching television or sometimes even reading a book. Most of the times it can be rather annoying to the people around me, but like I keep telling them, "trust me, I have a system". So, quite naturally, I am partial to vegetable that can do two things at once, like my little cauliflower florets, which can be appetizers/ snacks and then made into a curry in a jiffy.I have prepared crispy fried cauliflower florets today, but I'll show you how in a few quick steps it can be made into yummy curry too.

Here are the things you need,
- 1 large cauliflower cut into little florets
- 1 cup all purpose flour
- 1/2 corn flour
- 1 tsp paprika/chilly powder
- salt to taste
Method:
- Mix together the flour, cornflour,paprika and salt together along with water to form a thick batter.
- Dip the cauliflower florets into it and coat it with the batter well and fry it in oil.
- Serve!
Now, if you wanted to make a curry out of it, then this is what you would have to do,
- In a large pan, saute diced onions, green chillies, finely diced ginger and garlic.
- Then add diced bell peppers to it and saute until slightly soft.
- Now add some soy sauce and tomato sauce and mix well.
- Now add the fried cauliflower florets and toss it well, until the sauce coats everything.
- Mix a 2 heaped tsp of flour with water and pour into the pan. This will thicken the sauce. If however, the sauce seems too think, then add a little more water to dilute it.
- Let it remain on heat for 2 minutes and then serve hot!

Wednesday, 17 August 2011
One step chicken curry or Delicious Onion chicken curry (I cant decide on a name!)
Who doesn't love a good curry? Particularly in England's wet weather, there is nothing that can keep me quite warm inside like a good spicy curry can. Most of the people I know are game for dinner of curry yet they all shy away from making one. Why you ask? Because curries always involve a lot of frying, grinding, mixing and seasoning of masalas and one wrong step can frankly ruin the flavours. So, for all of you who fancy a curry but don't wanna spend time on it. Here is a recipe for you. Came across it by chance and loved it when I ate it and then swore by it when I got the recipe. It is literally a one step chicken curry.

**I know, Its about time I got a new camera and stopped relying on my sad sad mobile phone. :(
Here is what you need,
- 1 kilo Chicken with bones (Don't really fancy boneless chicken unless the recipe absolutely calls for it)
- 1 kilo Onions coarsely chopped
- 1 bunch of curry leaves
- 3 tbsp oil
- 3 tbsp paprika
- 2 cloves of garlic finely chopped
- 1/2 tsp of garam masala
Method:
- In a pot, add the chicken and all the other ingredients and mix it all together thoroughly.
- Now put the pot on simmer and cook until the chicken is nice and tender
- Serve!
Simple, innit? So no more excuses for curry truants. You have to try this. Lemme know how it worked out for you.
** Instead of curry leaves, I've tried the recipe with coriander leaves and the result was still yummy. So feel free to try different herbs if you like

**I know, Its about time I got a new camera and stopped relying on my sad sad mobile phone. :(
Subscribe to:
Posts (Atom)
